Friday, July 29, 2011

Nutella Cupcake Recipe

Recently I have made the transition from a point and shoot camera to a dslr camera. I purchased the Canon Eos Rebel T3, a great entry level model for us slr newbies! Even on auto mode it takes great pictures that are worth the investment. I must admit, I now shoot everything....and I do mean everthing!

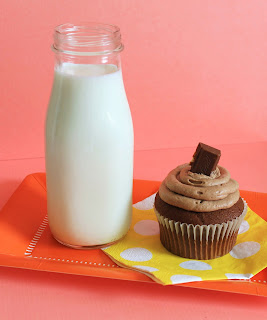
I recently experimented with Nutella flavored cupcakes....who doesn't love Nutella?! It tastes like a Ferrero Rocher but that should be of no surprise as the Ferrero company produces both Nutella and their famous Ferrero Rocher candies! The cupcakes turned out yuuummy! I made a basic chocolate cupcake and filled the inside middle part with Nutella buttercream frosting. You can also fill it with just Nutella alone but I must warn you this will make the cupcake that much more heavy....you are gonna need ALOT of milk! Try buying the cow, it will be cheaper! I prefer my cupcakes a bit lighter so I filled it with the frosting as I mentioned before. You can do this one of two ways, you can take out a portion of the cupcake with your fingers (don't worry the frosting on top should cover up the mess!) or you can use a Bismarck Tip and pipe in the Nutella frosting until the cupcake plumps up a bit. Once you are done that, swirl on the frosting on top and garnish with an almond milk chocolate Lindt square.

Nutella Buttercream Frosting

Ingredients:
2 sticks unsalted butter, softened
1 13-ounce jar of Nutella
Pinch of salt
1 tablespoon clear vanilla extract
2 pounds confectioners’ sugar, sifted
6-8 tablespoons heavy cream or milk

Directions:
1. In bowl, blend butter and Nutella until combined. Slowly add in confectioner’s sugar, and continue creaming until well blended.
2. Add salt, vanilla, and 4 tablespoons of heavy cream or milk. Blend on low speed until moist. Add an additional 3-5 tablespoons of heavy cream or milk until you reach the desired consistency. Beat at high speed until frosting is smooth and fluffy.

Yields enough frosting for 24 cupcakes

Monday, July 4, 2011

Sweet Shoppe Party

So for awhile I have been fascinated with Amy Atlas' work. If you do not know who she is, she is the Queen of the dessert table! You can see her work almost on any blog that speaks about candy buffets, dessert tables etc. And if you have not heard of her I suggest you do a quick google search and get ready to feast your eyes on the best eye candy you will ever see! Anyhow inspired by her lovely work I wanted to take a stab at creating my own candy buffet table for a Sweet Shoppe Party I hosted for my daughter. My color theme was hot pink, orange, yellow, and hints of blue. I loved how it turned out! The candy buffet table had a lot of vintage inspired items on it from vintage candy buttons, rock candy on a stick and strings, to wax liquid candy filled bottles. Even some of the jars I used had a semi vintage apothecary jar feel to it. I have posted more pictures for your viewing pleasure here. Should you want to host your own party and have questions on where to purchase some of these items then feel free to leave me a comment and I'll do my best to respond!

Tuesday, June 7, 2011

Diy Paper Lanterns....Move Over Tissue Paper Pom Poms!!!!!

Tissue paper pom poms are all the rage on the diy party decorating scene thanks to Martha Stewart. They can be seen on just about every blog that showcases those lovely diy style parties. However thanks to Martha once again there is a new decor idea for your parties. These festive tissue paper lanterns seen in June's Good Things are a bit time consuming to make but the end result is worth every moment spent! For a step by step tutorial click here!

Wednesday, May 25, 2011

Water Party Sponge Ball Tutorial

Summer is here and along with it comes all the activities one must dream up to keep their kids occupied. Water activities go hand in hand with the season so a simple search of the internet will uncover tons of water related fun things to do. However the craft loving person I am, I simply can not let any opportunity pass where I don't whip out my craft tools! The blog "One Charming Party" fulfills that need by showing us how to make even your dish washing sponges look oh so cute! Just follow these simple instructions found here and enjoy the rest of your summer!

Friday, May 6, 2011

Watermelon and Cantaloupe Fruit Popsicles

And the world's WORST blogger award goes to (drum roll please)....you guessed it!.....The LemonDrop Tree!!! Yes it really has been over three months since my last post! Don't worry, its not just my blog that has been neglected....just about everything else in my life has been neglected too because of those time/energy/fun/life sucking creatures I call my kids! I DO love them but sometimes I want to... (*note* keep thoughts to self!) Anyhow I'm back...for now! My adventures in late night internet surfing brings me to these little oh so easy fruit popsicle delights courtesy of the Bakers Royale blog! Who doesn't love popsicles?! All you need is a watermelon and cantaloupe. Cut the watermelon in slices and cut out flowers using a metal flower cookie cutter. Cut out the center using a round cookie cutter. Discard round center in mouth! Moving on along....using a melon baller, scoop out balls from the cantaloupe and place them in the middle of the watermelon flowers. You can also reverse this and cut out flowers from the cantaloupe and balls from the watermelon to achieve the look in the picture. Next insert popsicle sticks prior to serving to avoid getting them soggy and enjoy!

Thursday, January 20, 2011

Bright Blossoms

Yes say it ain't so?! TWO postings in a month? Wow that must mean I have some time on my hands? Not really!!!! My hands ARE full with three kids but I still take time out to appreciate life's little things! And I appreciate all things that make me whisper "eye candy!" So this next item didn't whisper it as so much scream it to me! I love these beautiful flowers especially because they are made of (and you'll never guess!)......shopping bags!!!! I know eh? Who would have guessed? I found this shop here on etsy selling them in all types of colors and materials. So even if you don't plan on buying them, take a peak in the shop just to make your day that much brighter!

Wednesday, January 12, 2011

Diy Barcode Wall Art

We all have boring open white spaces on our walls that could use a little eye candy sometimes. The problem is how to do and make something fun and interesting but not spend a ton of money. The following tutorial will show you how to recreate a magnified image of barcode wall art. This is as inexpensive as it is bold! All you need is a roll of electrical tape and some vinyl numbers found at an office supply store. The most important point if you choose this project is to make sure that your edges are perfectly straight. If you just wing it your lines will begin to look crooked and you won't get the look you want. Blue painter's tape is used here to maintain straight lines that can be removed when you are finished the barcode.