Summer is here and along with it comes all the activities one must dream up to keep their kids occupied. Water activities go hand in hand with the season so a simple search of the internet will uncover tons of water related fun things to do. However the craft loving person I am, I simply can not let any opportunity pass where I don't whip out my craft tools! The blog "One Charming Party" fulfills that need by showing us how to make even your dish washing sponges look oh so cute! Just follow these simple instructions found here and enjoy the rest of your summer!
Wednesday, May 25, 2011
Water Party Sponge Ball Tutorial
Summer is here and along with it comes all the activities one must dream up to keep their kids occupied. Water activities go hand in hand with the season so a simple search of the internet will uncover tons of water related fun things to do. However the craft loving person I am, I simply can not let any opportunity pass where I don't whip out my craft tools! The blog "One Charming Party" fulfills that need by showing us how to make even your dish washing sponges look oh so cute! Just follow these simple instructions found here and enjoy the rest of your summer!


Friday, May 6, 2011
Watermelon and Cantaloupe Fruit Popsicles
 And the world's WORST blogger award goes to (drum roll please)....you guessed it!.....The LemonDrop Tree!!! Yes it really has been over three months since my last post! Don't worry, its not just my blog that has been neglected....just about everything else in my life has been neglected too because of those time/energy/fun/life sucking creatures I call my kids! I DO love them but sometimes I want to... (*note* keep thoughts to self!) Anyhow I'm back...for now! My adventures in late night internet surfing brings me to these little oh so easy fruit popsicle delights courtesy of the Bakers Royale blog! Who doesn't love popsicles?! All you need is a watermelon and cantaloupe. Cut the watermelon in slices and cut out flowers using a metal flower cookie cutter. Cut out the center using a round cookie cutter. Discard round center in mouth! Moving on along....using a melon baller, scoop out balls from the cantaloupe and place them in the middle of the watermelon flowers. You can also reverse this and cut out flowers from the cantaloupe and balls from the watermelon to achieve the look in the picture. Next insert popsicle sticks prior to serving to avoid getting them soggy and enjoy!
Thursday, January 20, 2011
Bright Blossoms
 Yes say it ain't so?! TWO postings in a month? Wow that must mean I have some time on my hands? Not really!!!! My hands ARE full with three kids but I still take time out to appreciate life's little things! And I appreciate all things that make me whisper "eye candy!" So this next item didn't whisper it as so much scream it to me! I love these beautiful flowers especially because they are made of (and you'll never guess!)......shopping bags!!!! I know eh? Who would have guessed? I found this shop here on etsy selling them in all types of colors and materials. So even if you don't plan on buying them, take a peak in the shop just to make your day that much brighter!
Wednesday, January 12, 2011
Diy Barcode Wall Art
 We all have boring open white spaces on our walls that could use a little eye candy sometimes. The problem is how to do and make something fun and interesting but not spend a ton of money. The following tutorial will show you how to recreate a magnified image of barcode wall art. This is as inexpensive as it is bold! All you need is a roll of electrical tape and some vinyl numbers found at an office supply store. The most important point if you choose this project is to make sure that your edges are perfectly straight. If you just wing it your lines will begin to look crooked and you won't get the look you want. Blue painter's tape is used here to maintain straight lines that can be removed when you are finished the barcode.
Thursday, December 9, 2010
Free Printable Rainbow Stationary and Accesories
 Its "freebie" time again!!!!! I love love love "free" and I know you all do too! I found this adorable Rainbow Stationary set on Paper Glitter's blog found here. It includes a few things such as the printable notes, envelopes, envelope liners, and circle tags which can double as cupcake toppers! I even found a matching party kit on their site. If you are looking to further coordinate and make your package or notes stand out from the rest you can add my chipboard epoxy button embellishments in the Rainbow Bright collection found here to them. Of course if they are "sold" in my shop feel free to contact me and I'll custom make you a set for you. Paper Glitter's blog is filled with wonderful bright things to look at and she has a shop as well. They specialize in printable items such as stationary, party decor, and paper dolls and I have to say
they sure are stunning!
Tuesday, November 16, 2010
Whimsical Fun DIY Decorated Water Bottles
 For awhile I've been thinking of throwing my daughter a party. I have to say the most fun part is thinking of a theme and decorating around it. There are websites that provide endless inspiration. However the biggest thrill is when you could put something together that is SUPER CHEAP! Yes that's right, I said cheap!!! So with that being my inspiration my latest craft I give you are these cute little diy decorated water bottles. All you need is a case of the small water bottles and a roll of large size kawaii deco tape. You can find kawaii deco tape on Etsy by doing a simple search under the supplies category.
 Instructions:
1) Measure the circumference around your bottle.
2) Cut tape according to length.
3) Peel off backing and adhere to bottle(s).
It's that simple!
Monday, November 1, 2010
Customizable Diy Clock
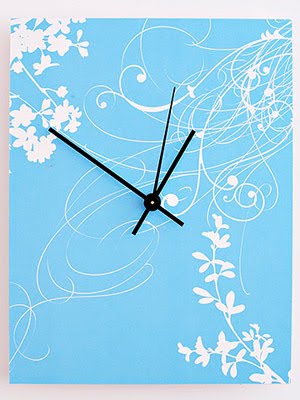 Tick tock, tick tock....do you hear that? Thats the sound of time telling you that your boring walls need a little sprucing up! However you won't need much time to make this easy diy clock that can be customized to match your room in millions of ways thanks to the clever scrapbook industry. For as much paper there is on the market, you have that many choices on how you want your clock to look.
What you'll need;
Instructions;
- Decide on your clock's shape. Adhere paper to foam-core board using spray adhesive. Cut out the desired shape using a crafts knife.
- If desired, paint chipboard numbers in a coordinating color; let dry. Attach to the clock face with glue.
- Mark the location for the clockworks. Using a 5/16-inch-diameter dowel sharpened to a point (or a round pencil or awl), puncture a 5/16-inch hole. Carefully trim excess paper from the hole with a crafts knife.
- Follow the manufacturer's instructions to attach the clockworks
Subscribe to:
Posts (Atom)


 Posts
Posts